Sunday, August 1, 2010

Chicken Pasties, or Chicken Hand Pies

One of my food blogging idols is Jaime on Sophistimom.  If you have not visited her site, please, go visit it and revel in her beautiful pictures and wonderful recipes.  I saw this amazing recipe on her site and just had to try it.  Not the least of the reasons why is because while reading Harry Potter my mouth always waters at the mention of pasties, and here is a recipe for one!  But that's a story for another time.  Today I'm paying tribute to Jaime and her beautiful blog.  These are essentially a chicken pot pie wrapped in a pastry, making it easily transportable.  And was it ever delicious.  I think I needed to use a little bit more of the chicken broth in the filling, and I think a little bit too much flour got into my pastry, but it was heavenly nonetheless.  When you see the method, please don't let it turn you off from making it.  It looks long, but it's not hard and doesn't even take up all that much time.  In fact, the pastry and the filling can both me made as early as the night before and then refrigerated until needed.  Make them for someone special for an extra treat.  Make them for a picnic or a camping trip.  They really are fabulous, and you will not regret it.

Chicken Pasties, or Chicken Hand Pies
by Jaime on Sophistimom

1 medium potato, peeled and diced
1 tablespoon olive oil
1 small onion, finely diced (I omitted this and added more celery to replace it)
1 stalk celery, finely diced (I added 1-2 stalks)
2 large carrots, chopped
1 tablespoon butter
1 tablespoon flour
1 14-oz can chicken stock
1 bouillon cube or 1 tablespoon Better than Bouillon
Salt and pepper to taste
1-2 boneless, skinless chicken breasts, cut into 1/2-inch pieces
Pastry dough (recipe follows)
1 egg, plus a teaspoon of water, beaten

Place potatoes in a medium saucepan, and cover with water.  Bring to a boil over high heat.  Cook until potatoes are tender to the point of a knife.  Drain and set aside.  While the potatoes cook, set a large skillet over medium low heat and add in the olive oil, onion, celery, and carrots.  Cook until onions are very tender, about 12-15 minutes.
Melt butter into the mixture and stir in flour.  Let cook for 2 minutes or so, just to let the flour taste cook out.  Pour in about half of the can of chicken stock.  Add the bouillon and potatoes.  Let simmer for a few minutes and taste for flavor.  Add salt and pepper if needed.  Add in chicken and simmer until cooked through.  The mixture should be thick, but not too dry.  Add more chicken stock until you achieve the desired consistency (she used the whole can).  Store mixture in refrigerator until ready to use (the pies are easier to make if the filling is cold).
Preheat oven to 425.  Place a piece of parchment paper in a baking sheet and set aside.  Roll out the pastry dough on a floured surface 18x22-inch rectangle.  (A note on rolling: I have no idea how people get perfect circles or rectangles when rolling.  I never can.  So don't worry if some of your pies are misshapen - they will still taste good!)  Cut in half, then cut each half in thirds, to make 6 equal smaller rectangles.
Spoon 1/4 cup of the chicken mixture onto one of the rectangles of dough, placing it slightly off center.  Wet the edges of the dough with a pastry brush and water, and fold the longer end of the pastry up and over the filling.  Press the dough down to seal it, and then crimp with the edges of a fork.  Place on the prepared baking sheet.  Make two incisions in the top of the pastry with a sharp knife, and brush with the beaten egg and water.  Repeat with remaining 5 pastries.  Refrigerate for at least 30 minutes.
Bake for 15-20 minutes, or until the pastry is golden brown and puffed.


Pastry Dough

2 1/4 cups flour
1 1/2 teaspoons salt
1 teaspoon sugar (optional)
1 stick (1/2 cup) cold unsalted butter, cut into 1/2-inch cubes
1 egg, slightly beaten
1/3 cup ice cold water

In a food processor fitted with the blade attachment, pulse together the flour, salt and sugar.  Add in the butter, and pulse a few times until the mixture is crumbly and resembles coarse meal.  Combine the egg and water in a container (remove all ice pieces).  While the processor is running, pour the water/egg mixture in and pulse until mixture just comes together.
Pour mixture out onto a floured board and knead a few times to bring all the ingredients together. (I think this is where I got too much flour in the dough.  Be careful!)  Dough can be rolled out immediately, or it can be wrapped in plastic and refrigerated for up to 2 days.

Thursday, July 29, 2010

Peaches and Cream

This dish truly is simple summer perfection.  I happened to have all of the ingredients on hand the other day (since I have been gorging myself on peaches the last couple of weeks) and realized that I had never had peaches and cream.  It could not be simpler or more delicious, and I have been craving it ever since.  Ok, I'll admit it - I ate this 3 times last week.  It's that good!  It could easily be done for breakfast as well as dessert.  This is definitely going to become a summer tradition at my house.

Peaches and Cream

1 ripe peach, pitted and cut into slices
Heavy cream
Sugar

Put the peaches in a bowl, pour some heavy cream over the top, and sprinkle with sugar.  Enjoy on the patio or with a good movie!

Monday, July 26, 2010

Classic Bruschetta, First Trial

When I saw the movie Julie and Julia, my reaction to the food was mixed.  Some of the items made me feel a bit queasy, and I don't think I would touch them with a 10 foot pole.  On the other hand, the other half of the recipes in the movie made me so hungry and I was just craving them for the longest time.  One of those is the bruschetta that Amy Adams makes at the very beginning of the movie.  Oh. My. Gosh.  I just about died when I saw that bread going in the oil and getting crispy and brown.  So I took it in my own hands to figure out how to make this delectable dinner.  I served this to my husband along with plain pieces of French bread that we dipped in a garlic dipping sauce and butter and honey.  It was delectable.  I say first trial because this one wasn't 100% perfect.  There's not quite enough basil, and the bread, although delicious, wasn't exactly what I had imagined.  I think the skinny baguette that I used wasn't wuite what I had in mind for a dinner of bruschetta, but it would be perfect for an appetizer.  This meal could not be easier, more delicious, or more satisfying.

Classic Bruschetta

4 tomatoes, chopped in large chunks
2 garlic cloves, minced
1/8 cup basil, torn into small pieces (I would definitely add more next time - at least 1/4 cup)
3/4 teaspoon salt
1/2 teaspoon freshly ground pepper
1 tablespoon olive oil plus more for frying
Baguette, sliced into 1 inch pieces

Combine tomatoes, garlic, basil, salt, pepper and 1 tablespoon olive oil in a bowl.  Let marinate in the refrigerator all day.  (I made it that morning after breakfast.)
Put a medium pan over medium-high heat.  Pour enough olive oil in the pan to cover the bottom.  Once it is hot, using tongs and working in batches, put the bread in the oil.  Fry until golden brown and crispy, which will take a few minutes.  Flip the pieces over and let fry until golden and crispy on the other side, an additional few minutes.  Remove from pan.  Cover the bottom of the pan with olive oil again and repeat the process with the rest of the bread.
Top the bread with the tomato mixture and enjoy!

Friday, July 23, 2010

Orange Julius

I got this recipe from my friend Kristen over at Homemade Made Easy.  This is the simplest drink in the world - if you can push a button, you can make it.  It's sort of like a smoothie, but not quite.  It's more like orange juice on steroids.  It would be so easy to pull together in 2 seconds if you want to have company for breakfast or brunch, and is totally refreshing on a summer day.  You may even have everything you need right now, in which case, you should go into your kitchen and make it.

Orange Julius

12 oz frozen orange juice
12 oz water
2 teaspoons vanilla
3/4 cup sugar
3+ cups of ice cubes

Put in a blender and blend.  Enjoy!

Wednesday, July 21, 2010

Raisin Swirl Bread

I'm not usually one for process shots, but I had to with this bread.  Scroll down to see the finished product.  I have always had trouble cooking with yeast until this summer.  I have been making all kinds of breads and other things that require it so that I can practice, and it has been a huge success.  It is amazing to me that yeast it the difference between flat dough and a puffy loaf of bread.  And this bread was so worth the effort.  Here is what it looked like before the oven:

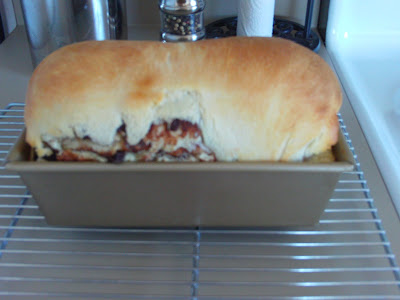
Here is what it looked like after:
While it was cooking it filled my apartment with the most heavenly smells.  I could barely wait for it to cool down enough to touch it before eating it.  It was phenomenal.  Dorie Greenspan, who I had never heard of about a year ago, is the author of this recipe.  She has some fantastic recipes, and this is no exception.  The bread is thick and chewy with just the right amount of sweetness.  I should have tried it as french toast.  I bet it would have been to die for.  As it was, it was wonderful just plain or toasted with butter.  Please don't be afraid of the yeast.  Use it.  It makes delicious food that makes your tummy happy.

Raisin Swirl Bread
from Baking: From My Home to Yours by Dorie Greenspan

Bread:
1 packet active dry yeast (if you buy the jars like me, that's 2 1/4 teaspoons)
1/4 cup sugar, plus a pinch
1 1/4 cups just-warm-to-the-touch whole milk (I used 1%)
4 tablespoons unsalted butter, at room temperature
3/4 teaspoon salt
1 large egg
1/4 teaspoon vanilla extract (optional, I used it)
Grated zest of 1/2 orange (optional, I didn't use it)
Pinch of freshly grated nutmeg (optional, to be honest, I don't remember if I used it)
3 1/4 to 4 cups flour

Swirl:
1 tablespoon sugar
2 teaspoons cinnamon
2 teaspoons unsweetened cocoa powder (optional, I used it)
1 cup moist, plump raisins (dark or golden)
3 tablespoons unsalted butter, softened to a spreadable consistency

To Make the Bread - Put the yeast in a small bowl, toss in the pinch of sugar and stir in 1/4 cup of the warm milk.  Let rest for 3 minutes, then stir - the yeast may not have dissolved completely and it may not have bubbled, but it should be soft (mine did bubble).
Working with a stand mixer, preferably fitted with the paddle attachment, combine the remaining 1 cup milk, the butter and the remaining 1/4 cup sugar and mix on low speed for a minute or two.  Add the salt, egg and vanilla, if you are using it, as well as the zest and nutmeg, if you are using them, and mix for a minute.  In all likelihood, the mixture will look unpleasantly curdly (it will look even worse when you add the yeast).  Add the yeast mixture and beat on medium-low speed for 1 more minute.
Turn the mixer off and add 2 3/4 cups of the flour.  Mix on low speed just until you work the flour into the liquids - you'll have a sticky mix.  If you've got a dough hook, switch to it now.  Add another 1 cup flour, increase the mixer speed to medium and beat the dough for a couple of minutes.  If the dough does not come together and almost clean the sides of the bowl, add up to 1/4 cup more flour, 1 tablespoon at a time.  Keep the mixer speed at medium and knead the dough for about 3 minutes, or until it is smooth and has a lovely buttery sheen.  The dough will be very soft, much too soft to knead by hand.
Butter a large bowl, turn the dough into the bowl and cover the bowl tightly with plastic wrap.  Put the bowl in a warm place and let the dough rise until it is doubled in size, about 1 1/2 hours.
Scrape the dough onto a large piece of plastic wrap, wrap it and put it in the freezer for 30 minutes to firm enough to be rolled easily.  (At this point, you can instead refrigerate the dough overnight if that's more convenient.)

To Make the Swirl and Shape the Loaf - Butter a 9x5 inch loaf pan.  Whisk together the sugar, cinnamon and cocoa, if using.
Put the dough on a large work surface lightly dusted with flour, lightly dust the top of the dough and roll the dough into a rectangle about 12x18 inches.  (I can never seem to get a perfect rectangle.  If you can't, don't worry about it.)
Gently smear 2 tablespoons of the butter over the surface of the dough - this is most easily done with your fingers.  Sprinkle over the sugar mixture and scatter over the raisins.  Starting from a short side of the dough, roll the dough up jelly-roll fashion, making sure to roll the dough snugly.  Fit the dough into the buttered pan, seam side down, and tuck the ends under the loaf.
Cover the pan loosely with wax paper (or a towel) and set in a warm place; let the dough rise until it comes just a little above the edge of the pan, about 45 minutes.

Getting Ready to Bake - When the dough has almost fully risen, center a rack in the oven and preheat to 375.  Line a baking sheet with parchment or a silicone mat.  (I didn't use the baking sheet.)
Melt the remaining tablespoon of butter, and brush the top of the loaf with the butter.  Put the pan on the baking sheet and bake the bread for about 20 minutes.  Cover loosely with a foil tent and bake for another 25 minutes or so, until the bread is golden and sounds hollow when the bottom of the pan is tapped.  Transfer the pan to a rack and cool for 5 minutes, then unmold.  Invert the bread and cool to room temperature right side up on the rack.

Sunday, July 18, 2010

Ebelskivers, or Danish Filled Pancakes

I first heard of these cute little round pancakes when Williams-Sonoma started advertising their ebelskiver pans a couple of years ago. I immediately wanted one (of course I did - all I ever want is new kitchen stuff). Whenever I get some extra money, I generally head to Williams-Sonoma first to see if there is something I want. Usually there is. And one of these such times, I very unpractically, decided to buy one. And then I didn't use it until very recently. But oh goodness, these were worth the wait. They are beautiful, delicious, and can be made in tons of different ways. You can pretty much put whatever you want in the middle - let your imagination run wild. Peanut butter, jams, nutella, chocolate chips, pumpkin, and any number of fruits. Here there are just some fresh blueberries in the middle. Unfortunately, you do need a special pan to make them that looks like this.
It is so worth it to own the pan though. You can look at them here. These are easy and fun, and would be great for any number of occasions: brunch, sleepovers, etc. If you can, please make these sometime soon! This, and other ebelskiver recipes can be found at williams-sonoma.com.


Blueberry-Filled Ebelskivers
from williams-sonoma.com

1 3/4 cups flour
3/4 teaspoon baking soda
1 teaspoon baking powder
1 1/2 tablespoons sugar
1/2 teaspoon salt
3 eggs, separated
1 3/4 cups buttermilk
4 tablespoons unsalted butter, melted
1 pint fresh blueberries
Powdered sugar, for dusting
Maple syrup, for serving

In a bowl, whisk together the flour, baking soda, baking powder, sugar and salt. In a small bowl, lightly whisk together the egg yolks and buttermilk. Whisk the yolk mixture into the flour mixture until well combined; the batter will be lumpy.
In the bowl of an electric mixer fitted with the whisk attachment, beat the egg whites on high speed until stiff but not dry peaks form, 2-3 minutes. Using a rubber spatula, gently fold the whites into the batter in two additions.
Put 1/2 teaspoon butter into each well of a filled-pancake pan. Place over medium heat and heat until the butter begins to bubble. Pour 1 tablespoon batter into each well and cook until the bottoms are golden brown and crispy, 3-5 minutes. Put 5-6 blueberries in the center of each pancake (I only did 3-4) and top with 1 tablespoon batter. Using 2 wooden skewers (I used forks, which takes some practice) flip the pancakes over and cook until golden and crispy, about 3 minutes more. Transfer to a plate. Repeat with the remaining batter and blueberries. Makes about 40.

Friday, July 16, 2010

BBQ Pulled Chicken Sandwiches

I usually love the 4th of July.  We get together with family, eat tons of fabulous food, and watch fireworks, which are always thrilling.  When I was still living with my parents, we would go to my grandparents' house, sit on the golf course they lived above, and watch the fireflies and fireworks after a whole day of swimming.  After I got married, we went to my husband's parents house for their block party and had a great barbecue potluck, and then set off fireworks on the street.  This year, however, was very different.  My husband joined the Coast Guard almost 6 months ago, and as such, we moved to southern Oregon, which is far away from any family.  My husband also just happened to be on duty the whole holiday weekend, including Sunday.  With two very small children, it just didn't work out to get to see any fireworks.  But I will be darned if I won't get good food on the 4th!  I made these delicious Pulled Chicken Sandwiches from Cooking Light, paired them with corn and watermelon, and took dinner to the hubs down at the station.  Even though I saw one measly firework that day, at least I got some good barbecue.

Pulled Chicken Sandwiches
from Cooking Light, June 2006

Chicken:
2 tablespoons dark brown sugar
1 teaspoon paprika
1 teaspoon chili powder
3/4 teaspoon cumin
1/2 teaspoon ground chipotle chili pepper (I just used a little extra chili powder)
1/2 teaspoon salt
1/4 teaspoon ground ginger
2 pounds skinless, boneless chicken thighs (I used breasts)
Cooking spray

Sauce:
2 teaspoons canola oil
1/2 cup finely chopped onion (which I omitted, since my husband has onion issues)
2 tablespoons dark brown sugar
1 teaspoon chili powder
1/2 teaspoon garlic powder
1/2 teaspoon dry mustard
1/4 teaspoon ground allspice
1/8 teaspoon ground red pepper
1 cup ketchup
2 tablespoons cider vinegar (I used white vinegar)
1 tablespoon molasses

Remaining Ingredients:
8 sandwich rolls, toasted
16 hamburger dill chips

(Note: I halved this recipe, which was really easy to do.)  Prepare grill.  (I just cooked the chicken in a pan on my stove on medium-high heat.)  To prepare chicken, combine first 7 ingredients in a small bowl.  Rub spice mixture evenly over chicken.  Place chicken on a grill rack coated with cooking spray; cover and grill 20 minutes or until a thermometer registers 180, turning occasionally.  Let stand for 5 minutes.  Shred with 2 forks.
To prepare sauce, heat canola oil in a medium saucepan over medium heat.  Add onion; cook 5 minutes or until tender, stirring occasionally.  Stir in 2 tablespoons sugar and next 5 ingredients (through pepper); cook 30 seconds.  Stir in ketchup, vinegar, and molasses; bring to a boil.  Reduce heat, and simmer 10 minutes or until slightly thickened, stirring occasionally.  Stir in chicken; cook 2 minutes or until thoroughly heated.
Place about 1/3 cup chicken mixture on bottom halves of sandwich rolls; top each serving with 2 pickle chips and top roll half.
Related Posts with Thumbnails